Until this winter, I'd not been home enough during the day to realize how the glare from these windows would be strong enough to even wash out the TV. I love the old windows though, and don't want to cover them too much.
These are some cheap wooden blinds I'd had in a room at the shop. With the move at the shop, I took them down and brought them home. They are the perfect width for these windows! woot! Pretty much free blinds! I did shorten them a bit so they wouldn't be so heavy.
One down, one to go. I think it's going to work! You can see it cuts the glare quite a bit, and when they are up, the pretty old windows are still showing off.
All done! I think it looks pretty good and solves the problem just fine!
"To invent, you need a good imagination and a pile of junk."
~Thomas Edison
I love art, gardening, junking and all kinds of vintage stuff! This blog will have treasures I find, things I have remade into new treasures, cool vintage stuff- and also photos I take of garden art and recycling that I find on my jaunts. And of course it will feature my home...the ultimate recycling/renovating project!
Showing posts with label decorating. Show all posts
Monday, March 23, 2015
Friday, July 18, 2014
Bathroom Shower Doors Removed
There are so many things I want to do to this tiny bathroom, but most will have to wait because it's just not in the budget right now. I've been frustrated with not being able to get these shower doors really sparkling clean, so I decided to just take them out. I did this at the old house too. It's easier to launder a shower curtain than keep shower doors looking good. Today I took the screw gun to the frame, and hauled it to the curb.
Now I've got a clean shower curtain and liner. I don't know that this shower curtain will make the cut, but it looks fine for now. That old track for the shower doors was sealed with caulk, but there was still a lot of water and yucky mess under the track. I'm glad it's gone. Someday I'd like to put a tub/shower in, and tile the tub/shower walls. I'd like to tile the floor too.
I'd love to put in a sink like this one:
Now I've got a clean shower curtain and liner. I don't know that this shower curtain will make the cut, but it looks fine for now. That old track for the shower doors was sealed with caulk, but there was still a lot of water and yucky mess under the track. I'm glad it's gone. Someday I'd like to put a tub/shower in, and tile the tub/shower walls. I'd like to tile the floor too.
I'd love to put in a sink like this one:
I like the shape and the fact that it has a towel bar right there where you need it. Cool floor too.
I like the wall color in this one. Kind of a beach glass, or water color.
When I was antiquing last week I bought this great mirror to go over the sink (when I get it replaced). I love it and it's tall. That artwork will hang over the towel bar opposite the sink.
I guess I need to go work on putting the towel bars in, because when I threw out the shower doors, the towel bars went with them!
Tuesday, February 04, 2014
Organizing...my way.
I've been organizing, and I've been doing it my way, which is why I'm organizing my art room, but you are seeing a picture of the corner of my bedroom. Makes perfect sense, right?
One thing seems to lead to another. My art room was FULL of boxes and many of them contained books. Boxes of books are heavy. I just wanted to put them away, not cart around heavy boxes. At first glance it seemed there was no place in my little house for more shelves, but I had these two little white shelves in the attic. I carried them down and found that I could squeeze them behind the chair in the bedroom if I stacked them on top of each other. I filled them with the books and now I have more space to walk in the art room. I will attach these to the wall so they cannot be turned over, since once in a while I have little ones in the house.
Lately I've been embracing my own way to organize or do chores. I alternate the chores and the fun stuff. I do something that I've been putting off, such as cleaning out a junk drawer or emptying boxes that have been waiting since I moved here a year ago. Or if I'm going a pretty big project like organizing the art room, I do a little chunk of it, like sort through a few boxes, or clear off and organize a shelf or two. Then I do something fun.....like hang some pictures that I've been meaning to get up, or hanging the bird feeder I want outside the art room window. I pick something that make my eyes happy...and that can be done in a fairly short amount of time. Then back to doing another shelf or two. It works for me.
I learned this from my Mom, and as usual she was right. If I painted a room, I started and plowed through it, and was exhausted at the end. Mom would get her paint brush out and do the trim around just he windows and then quit, and do other things. Then the next day she'd do some more. She keeps after it until it's done but she doesn't beat herself up doing it. And her house always looks nice. It's the same amount of work, of course, but pacing yourself, and rewarding yourself with fun breaks can make a big difference.
Every time I see that chair I smile. I got it at an auction for 2 dollars, and I've gotten soo many years of use out of it.
One thing seems to lead to another. My art room was FULL of boxes and many of them contained books. Boxes of books are heavy. I just wanted to put them away, not cart around heavy boxes. At first glance it seemed there was no place in my little house for more shelves, but I had these two little white shelves in the attic. I carried them down and found that I could squeeze them behind the chair in the bedroom if I stacked them on top of each other. I filled them with the books and now I have more space to walk in the art room. I will attach these to the wall so they cannot be turned over, since once in a while I have little ones in the house.
Lately I've been embracing my own way to organize or do chores. I alternate the chores and the fun stuff. I do something that I've been putting off, such as cleaning out a junk drawer or emptying boxes that have been waiting since I moved here a year ago. Or if I'm going a pretty big project like organizing the art room, I do a little chunk of it, like sort through a few boxes, or clear off and organize a shelf or two. Then I do something fun.....like hang some pictures that I've been meaning to get up, or hanging the bird feeder I want outside the art room window. I pick something that make my eyes happy...and that can be done in a fairly short amount of time. Then back to doing another shelf or two. It works for me.
I learned this from my Mom, and as usual she was right. If I painted a room, I started and plowed through it, and was exhausted at the end. Mom would get her paint brush out and do the trim around just he windows and then quit, and do other things. Then the next day she'd do some more. She keeps after it until it's done but she doesn't beat herself up doing it. And her house always looks nice. It's the same amount of work, of course, but pacing yourself, and rewarding yourself with fun breaks can make a big difference.
Every time I see that chair I smile. I got it at an auction for 2 dollars, and I've gotten soo many years of use out of it.
Wednesday, December 18, 2013
Christmas Decorating...White Christmas!
We've had snow...for the first time in a long while,
we are having what feels like a good old midwestern winter!
I've been doing some decorating. I started the weekend after Thanksgiving but have moved slowly getting the decorations up.
I pretty much keep the mantle the same, but add greens and some starfish and a Santa. That Santa holds a list and when ever new children are born in the family, I had their names to the list.
An old plastic Santa on the porch.
The cushions on the glider are very summery, so I covered them with an old, rather tattered, quilt.
Come on in!
Here's the house on a cold snowy night. I have the tree up now, so I'll take a few more pictures soon.
Thursday, October 24, 2013
Art Studio Table
I just bought this awesome vintage table from one of the dealers at Old City Hall Shoppes (like us on Facebook too!). I think the enamel surface will be great with all the paint and such that gets slung around doing mixed media work. I'm working on this little room that's off my living room, and it will be my art room.
Here is the little room right after the wallpaper was stripped.
Here it is again after I'd moved in, and was organizing. Well now that room as been a catch-all for everything, and it's time for me to get busy making it workable. I've got a commission I'm excited to start working on, and now that the shop is slowing down for the winter, it's time!
Sunday, September 29, 2013
Buying Artwork from Local Artists
What do you hang on your walls? I've got family photos of course, but I've also hung some artwork I've picked up over the years. I like to find unique things made by local people in my town or places I visit.
I saw this quilt at a local art gallery and frame shop years ago, and fell in love with it. My family bought it for me for my birthday that year. It's by local artist joanE Lipinski. I think when you find a piece that you love, you can buy it with the confidence that it will bring you years of enjoyment, because it speaks to you. You can see on my mantle, I also have some of my kids' artwork.
This carving was made by Gina Gaudesi, an artist I found on Flickr. That's a wonderful place to see artwork from people all over the world. Gina's photostream is here. Her Etsy shop is here. I hang old maps as artwork too, and you can see one peeking out in the background of this photo. I find them at antique shops and sometimes even at garage sales!
I bought these pottery pieces at Chartreuse Art Co-op in St.Joseph, Michigan. The top pieces are by Margaret Hogeboom. If I remember correctly, the fish is by Christina Root. Art co-ops are great places to find the work of local artists. We have a nice one here in downtown Pontiac on Madison Street.
Art fairs are also a good place to see the work of local artists. The big cities have them of course (and I like browsing those too), but plenty of smaller cities have wonderful festivals. Sugar Creek Arts Festival in Normal is a good one, and Krasl Art on the Bluff is another fun one where you can look at art all day, with beautiful Lake Michigan always in view. I've always wanted to go to ArtPrize in Grand Rapids, Michigan, but it's almost over again this year, so maybe I'll make it next year!
I saw this quilt at a local art gallery and frame shop years ago, and fell in love with it. My family bought it for me for my birthday that year. It's by local artist joanE Lipinski. I think when you find a piece that you love, you can buy it with the confidence that it will bring you years of enjoyment, because it speaks to you. You can see on my mantle, I also have some of my kids' artwork.
This carving was made by Gina Gaudesi, an artist I found on Flickr. That's a wonderful place to see artwork from people all over the world. Gina's photostream is here. Her Etsy shop is here. I hang old maps as artwork too, and you can see one peeking out in the background of this photo. I find them at antique shops and sometimes even at garage sales!
I bought these pottery pieces at Chartreuse Art Co-op in St.Joseph, Michigan. The top pieces are by Margaret Hogeboom. If I remember correctly, the fish is by Christina Root. Art co-ops are great places to find the work of local artists. We have a nice one here in downtown Pontiac on Madison Street.
Art fairs are also a good place to see the work of local artists. The big cities have them of course (and I like browsing those too), but plenty of smaller cities have wonderful festivals. Sugar Creek Arts Festival in Normal is a good one, and Krasl Art on the Bluff is another fun one where you can look at art all day, with beautiful Lake Michigan always in view. I've always wanted to go to ArtPrize in Grand Rapids, Michigan, but it's almost over again this year, so maybe I'll make it next year!
Sunday, September 22, 2013
Decorating the Porch
Here's the porch when I moved in. I mostly just cleaned it up with a hose and broom, and then proceeded to make it home. I took off the triple track storm frame and found this, so I scraped and painted a bit of trim:
Then I moved some furniture in and hung some lights. The vintage glider was a birthday present from my parents years ago. My mom saw it at a garage sale and knew I'd love it. Someday I'd like to take it to the body shop and have it painted red. The rug is from Pier One. It's supposed to be for outdoors, and the instructions say to hose it off when it needs more than vacuuming. That will be so much easier than having it cleaned, so I hope it lives up to those instructions! I love all the colors in it.
Before cleaning and moving in and...
after...that hammock is my favorite place to read. It's going to be getting cold soon, and I'll miss my porch.
Remember those little plants in an earlier post? They went haywire and got nice and big!
Thursday, December 20, 2012
Looking like Christmas!
A few years ago I bought a small artificial tree. I like it fine, but I miss the charm of a real tree. We always had a real tree while the kids were growing up. Next year if it fits in the budget, I will have a real tree. There are lots of lights on this little tree!
Looking into the dining room. There is only one electrical outlet in the dining room..and that is it by the window. So I've been putting garland up with lights, otherwise it's kind of dark.
My tree has no theme other than "ornaments collected through the years." I especially love the ones made by my kids.
The pictures on the mantle are of the kids and of my grandparents on the beach when they were young.
The mantle is a mix of lots of things. The little elf on the right is always decorating something every year...sometimes the mantle, sometimes the bathroom mirror, sometimes the tree...
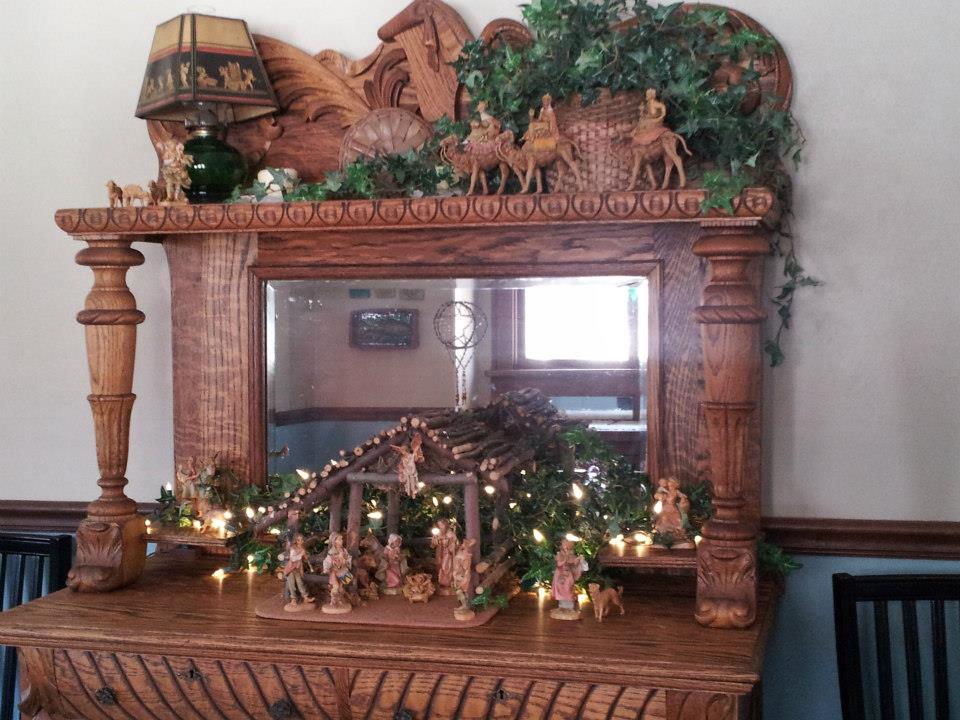
The nativity set is usually the first thing set up, and almost always on this buffet...so from year to year it doesn't look much different, but I still like it. Yes, found a way to run an extension cord around the corner for some lights on this too.
Here is the outside. I got that little Christmas tree at a friend's garage sale. It's rusty iron..I love it, and just threw a bunch of lights on it. I'm not crazy about the those blueish icicle lights...I like the warm white lights better. Next year I hope to figure out how to put the big colored lights along the roofline. I have all the lights on timers. I was so glad that this house has some outdoor outlets!
Monday, December 26, 2011
Window Film for Privacy
This is the bathroom window. It's a bit of a problem...I've just had a blanket hanging there for privacy. During that time I realized that I didn't want to lose all the light with curtains hanging here all the time.
When you walk out of the bathroom you are looking toward the stairs and this is what you see, so you'd better be sure you are dressed! This house has so many windows, and even the interior hall upstairs is flooded with light. I love that and didn't want to lose it!
Here's the bedroom. I like the view of the tree. It's like being in a treehouse, especially when it's all green and leafy. I decided to block out the view of the roof (and from some angles, the neighbor's garage).
I'd been looking for a window film at the home improvement stores, but didn't find a design I liked, so I went online and looked around. I found this window film by Emma Jeffs at PureModern.
These are the tools you need, plus a spray bottle of water. The window film is renter friendly because you can remove it without any residue or damage to the windows. It takes a bit of patience, but is not really too hard to put up. I did all these windows on Christmas morning.
First you roll the film out flat the night before and let it rest. Then cut the film slightly bigger than the window pane, peel the backing off, and mist the back side of the film with plain water. Then you apply the film to your clean window, using a credit card and a soft cloth to squeegee the bubbles and extra water out. At this stage you can still slide the film around a bit to get it just the way you want it. Finally, trim the edges with a sharp blade.
Here's the bedroom now. No more rooftop, or view of the neighbor's garage, and I can lay down for a nap and have a bit of privacy. Of course, I still pull the curtains at night for total privacy and to keep the room warmer.
When you come out of the bathroom, this is what you see now, and no one can see you either!
When you walk out of the bathroom you are looking toward the stairs and this is what you see, so you'd better be sure you are dressed! This house has so many windows, and even the interior hall upstairs is flooded with light. I love that and didn't want to lose it!
Here's the bedroom. I like the view of the tree. It's like being in a treehouse, especially when it's all green and leafy. I decided to block out the view of the roof (and from some angles, the neighbor's garage).
I'd been looking for a window film at the home improvement stores, but didn't find a design I liked, so I went online and looked around. I found this window film by Emma Jeffs at PureModern.
These are the tools you need, plus a spray bottle of water. The window film is renter friendly because you can remove it without any residue or damage to the windows. It takes a bit of patience, but is not really too hard to put up. I did all these windows on Christmas morning.
First you roll the film out flat the night before and let it rest. Then cut the film slightly bigger than the window pane, peel the backing off, and mist the back side of the film with plain water. Then you apply the film to your clean window, using a credit card and a soft cloth to squeegee the bubbles and extra water out. At this stage you can still slide the film around a bit to get it just the way you want it. Finally, trim the edges with a sharp blade.
Here's the bedroom now. No more rooftop, or view of the neighbor's garage, and I can lay down for a nap and have a bit of privacy. Of course, I still pull the curtains at night for total privacy and to keep the room warmer.
It's great for the bathroom. It obscures the view and provides privacy without sacrificing light.
When you come out of the bathroom, this is what you see now, and no one can see you either!
Here's the view from the entry downstairs as we were nearing evening. I was worried when I bought this product, because it's rather pricy, and if it turned out to be hard to apply, I'd be out the money. I'm glad I tried it though!
Here are some sites with pretty designs in window film:
Monday, November 29, 2010
Baby, it's cold outside!
So I switched out the bedding and went to flannel. And added some lights for a little Christmas sparkle. That's Michael's old monkey on the bed...he's dressed for Christmas year 'round.
Wednesday, July 07, 2010
Chalkboard Paint at the Shop
Since I already have a black and white and taupe kind of thing going on at the shop, I was inspired by this article in Cloth, Paper, Scissor's Studios Magazine to paint my office door with chalkboard paint. This is the studio of Kristin Krause. Check out her blog by clicking on her name.
So I got busy and painted a couple of coats of chalkboard paint on the door, and then used artists acrylics to paint details. You can see in the little sign above, I used chalk (clever, I know) to draw some guidelines on the door.
(as always, click on the pic to see it larger)
I think it turned out kind of neat, and now we can leave notes for each other right on the door, too. This is a good technique if you can't draw a straight line...because straight is not necessary!
Subscribe to:
Posts (Atom)


.jpg)

.jpg)


.jpg)